With summer finally here, denim
shorts are the go to outfits. This year, ditch plain denims and try out
the ombre effect! Ombre shorts are so fun and simple to make, check out this one that I made.

Getting right into the fun DIY stuff, start with any denim jeans or shorts you have (I started with jeans).
Step 1: Roughly cut off excess fabric from your jeans
 |
Step 2: Trace the shape of any other shorts that you like onto your jeans with some chalk.
 |
 |
Step 4: Finally, the much awaited process of getting the ombre effect begins! Grab a pair of gloves, bleach, and a tub (or bucket) filled with water. Make sure you do the bleaching process in the open, since the bleach lets out toxic fumes. Also, doing it during the day is helpful since the sunlight accelerates the process.


After mixing your bleach with some water, dip most of the bottom portion of your shorts into the tub or bucket. You can
use clips to keep your shorts in place.

Step 5: After you see the color of your shorts
fading, reduce the portion of your shorts that is dipped in. This is what gives
the ombre effect. Also, be cautious of over-bleaching- the final color will be a lot lighter once you wash and dry your shorts.
 |
| My shorts freshly bleached, while they're still wet. |
 |
| My shorts after being washed and dried. |
Step 6: Distress your shorts! There’s lots
of ways of doing this: you can use a blade, scissors, sand paper, tweezers or
even a nail filer (I used a nail filer and a blade). Make small cuts in your
shorts and rub anything rough like sandpaper or your nail file against them. You can also use your blade to scrape
the edges.


The last step is adding studs to your shorts, which is optional. I used fabric glue to stick the studs on.

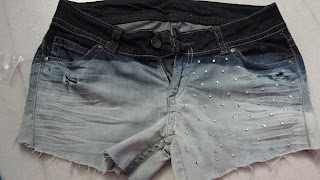
And now you have your trendy shorts all ready to be worn this summer! :)


The last step is adding studs to your shorts, which is optional. I used fabric glue to stick the studs on.


And now you have your trendy shorts all ready to be worn this summer! :)